
Mass Effect Modding Tutorial: Mesh Modding

You can do a lot with Mesh Modding, including replacing characters entirely – here’s an example where I replaced Jacob in the Citadel DLC Party with Mordin:

I already wrote a tutorial about how to replace meshes in-game, but here is a guide on how to extract them and edit them:
Extracting a Mesh:
- Open ME3Explorer and go to Meshplorer (Developer Tools > Meshplorer).
- Find the .pcc file that contains the mesh you want to extract. Use my spreadsheet as a guide.
- For example, say I want to extract Ashley’s tunic uniform – I would open BIOG_ASH_00_NC.pcc and see something like this:
![2013-11-30 16_59_32-ME3 Explorer by Warranty Voider - [Meshplorer]](https://girlplaysgame.com/wp-content/uploads/2013/12/2013-11-30-16_59_32-ME3-Explorer-by-Warranty-Voider-Meshplorer-500x281.jpg?x29393)
- Go to File > Export to PSK and save the .psk file.
- Now click your mouse over LOD – some uniforms only have LOD 1 and the rest of the LODs are greyed out. Some uniforms (like Ashley’s) have LOD 1, 2, and 3. If you click over to LOD 2 or 3, you’ll notice that mesh loses some detail in the preview panel:
![2013-11-30 17_04_38-ME3 Explorer by Warranty Voider - [Meshplorer]](https://girlplaysgame.com/wp-content/uploads/2013/12/2013-11-30-17_04_38-ME3-Explorer-by-Warranty-Voider-Meshplorer-500x281.jpg?x29393) This is because the different LOD meshes control how detailed the meshes are based on distance to the character in-game. You only really need to export LOD 1, but if you happen to be replacing another mesh that has three LODs, you can also export the other LODs to use in replacement. You can also just use LOD 1 (the most detailed mesh) to replace LOD 2 and 3 in another mesh if you want. The only difference is how much computing power your game will use (the difference is miniscule if you’re only replacing a few meshes, don’t worry! If my shitty laptop can run it, your computer probably can, too).
This is because the different LOD meshes control how detailed the meshes are based on distance to the character in-game. You only really need to export LOD 1, but if you happen to be replacing another mesh that has three LODs, you can also export the other LODs to use in replacement. You can also just use LOD 1 (the most detailed mesh) to replace LOD 2 and 3 in another mesh if you want. The only difference is how much computing power your game will use (the difference is miniscule if you’re only replacing a few meshes, don’t worry! If my shitty laptop can run it, your computer probably can, too).
Replacing a Mesh:
- There are two bits of information you’ll need to be aware of when replacing a mesh – the number of bones and the number of LODs. As an example, let’s say I want to use Ashley’s tunic to replace Shepard’s Defender Armor.
- You’ll notice that Ashley’s tunic has 120 bones. If you click on the plus sign, you’ll see a detailed list of the bones:
![2013-11-30 17_01_19-ME3 Explorer by Warranty Voider - [Meshplorer]](https://girlplaysgame.com/wp-content/uploads/2013/12/2013-11-30-17_01_19-ME3-Explorer-by-Warranty-Voider-Meshplorer-500x281.jpg?x29393)
- Most of these bones are the same as every other human character in the game, except the ones for Ash’s hair (ex: BackHairBottom) – make a note of this.
- Now look at Shepard’s armor – see how there are only 110 bones?
![2013-11-30 17_13_06-ME3 Explorer by Warranty Voider - [Meshplorer]](https://girlplaysgame.com/wp-content/uploads/2013/12/2013-11-30-17_13_06-ME3-Explorer-by-Warranty-Voider-Meshplorer-500x281.jpg?x29393)
- If you have the same exact bones in both the old mesh and the replacer mesh, you can import directly from .PSK without any hiccups or glitches in game. If there are a different number of bones (like in this case), you will have to edit the bones in 3DS Max. You need 3DS Max 2012 or EARLIER (here is a link to a verified cracked version) in order to use the plug-ins for Mass Effect importing.
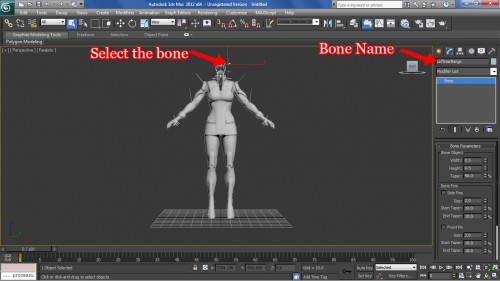
- Import Ashley’s tunic mesh in 3DS Max. In most cases with human meshes with “extra” bones, they will all be extra “hair” bones (ie. Ashley or Kai Leng). So delete all the bones that control Ash’s hair by clicking on the bone, checking the name of the bone, and hitting delete:
- When you’re done, you should have only 110 bones. Now, when you import the .psk to UDK, it should say there are only 110 bones. Save the file as a .upk and now you can replace the mesh in ME3 Explorer with no problems.
PS If you forget how to convert .psk to .udk, read my Hair Modding tutorial and scroll down to “Importing Long Hair Mods to Mass Effect” :)
FAQ
Q. Well, what happens if you import a UPK/PSK with a different number of bones?
A. ME3 Explorer will not allow you to import a UPK with a different number of bones. ME3 Explorer WILL allow you to import a PSK with a different number of bones, but the character will often have weird effects. For example, I replaced Jacob with Mordin by replacing the body and head meshes – the head mesh had a different number of bones but I was lazy and imported it anyway. My game worked and the character was fine, but when it made certain facial movements, Mordin’s eyes would bug out of his head a little because the bones that controlled the facial movements weren’t right. So, if you’re ok with that, fine. :)Q. Can I use ____’s armor on _____?
A. Theoretically, yes. But some things are harder to replace than others. Again, the number of bones is the most critical factor – For example, you can port Kai Leng’s armor to Kaidan, but you need to delete all his hair bones in 3DS Max. But if you want to port say Kaidan’s armor to Shepard, you don’t need to do additional editing.Q. Can I replace Character X with Character Y in the whole game?
A. Theoretically, yes. But, it’s not quite as simple as replacing a single .pcc file – there are several, if not dozens, of .pcc files that need to be replaced. For instance, if you want to replace Kaidan with Mordin throughout the whole game, you’ll not only need to replace the BIOH_Kaidan_xxxxx files, you’ll also need to replace the Normandy global file as well as every BIOD_xxxxx file that has Kaidan’s mesh in it. If you have a few scenes in mind you want to replace, it’s much more doable than trying to do the whole game.Also, as a rule, replacing one species (ie. humans) with another character of the same species (ie. humans) is pretty easy. Replacing one species (ie. humans) with another species (ie. Turian) is much more difficult as they do not share the same bones at all. It’s doable, it just will require some extra work in 3DS Max.
Well, that’s it for mesh modding. All good? Read more on modding!
Do you think you could do a tutorial on how to replace Kaidan with Thane throughout the game? I would really, really be greatful!!!!!
When I’m deleting bones in 3DS Max, how can I export the model to a PSK or UPK file in order to use in ME3Explorer? I’m using 3ds max 2014, thanks!
I am trying to replace Catalyst (star brat) with Avina, it imports and everything, but when I launch the game Avina looks like a dwarf, please give me some advice.. I really have no idea how to make it work and it is essential for making my mod.
No idea if it would work, but maybe try using 3dsMax or other 3D editing program to enlarge the Avina mesh to be larger so that when the game shrinks it, it shows as normal size?
The tutorial on how to replace mesh textures in game is giving an error code of page not found. I really really want to see this tutorial. Please and thank you. Love your website.
Sorry, fixed the link!
First off, thank you for your tutorials, I am loving my new femshep who is in existence only because of you. I do video editing as a hobby and there are some specific scenes that I wish to replace x character with y character as you talk about briefly in your questions and answers. Do you have a detailed tutorial on doing this available, am I just missing it or is it one of the page not found errors? Thank you for your time, I really appreciate it.
Sorry, I don’t have a detailed tutorial – I haven’t really done it myself, though I know it’s possible :(
Hi, I came across your tutorial as the first link and I think it can help me accomplish what I’m trying to do. However, your tutorial is geared towards editing character meshes– I’m trying to do something else. I want to edit the mesh of my rocket launcher in multiplayer. This thing:
http://vignette2.wikia.nocookie.net/masseffect/images/f/f9/ME3_Hydra_Heavy_Weapon.png/revision/latest?cb=20120317194543
It looks like crap to me, and I’d like to replace it with a model of something actually legitimately cool-looking (for example a Reaper Blackstar Cannon or ML77 Missile Launcher). At very least I just want the rocket itself to be altered, since that’s what I stare at the most on my back all the time, however, if I could also somehow edit the multiplayer missile launcher VFX to be replaced with the huge red explosion of the Blackstar, that would be an added bonus. Not sure if that’s at all possible, or if you know how to do it, but any assistance you could offer would be appreciated.
And to clarify, I don’t want to edit any mechanical attributes of the multiplayer missile launcher, since that could result in a ban, ONLY visual elements to make it /look/ cooler.
I tried looking my CookedPCConsole under all the PCC files and found a bunch for the multiplayer characters (which may be useful later on for my project where I wanted to swap out the Asari multiplayer models for Liara’s model), but nothing that looked like it would indicate the exact file of the missile launcher…
Ooooh that sounds really cool but unfortunately I’ve never modded multiplayer before … nor have I edited the weapon meshes though I assume it works the same way as replacing any other mesh? Sorry I can’t be more helpful! :(
Ok so new question– if I wanted to replace all the multiplayer Asari with Liara’s outfit, do I need to export Liara’s outfit and head and combine them in a program like 3ds Max and re-save them? And can I make it so that custom colors apply to various parts of Liara’s coat in multiplayer?
Yes, in theory you would have to replace the entire multiplayer Asari with all of Liara – I’m not sure how to make custom colors apply to different parts but poophairjones on tumblr has done it before so maybe she can help you!
Hi.
Thank you for the amazing Tutorial!
I want to give Joker an Alliance Dress Uniform. The standard fatigue that Joker wears has 115 Bones, but the Alliance Dress Uniform only has 110.
So far, you have just touched on the topic of deleting redundant Bones.
How should I go about adding five additional bones?
Best regards
Malte
p.s. One last thing: I downloaded the 3ds Max version in your article. You need to update the link to the torrent file. Currently it is https://thepiratebay.sx/torrent/6307052/ but it should be https://thepiratebay.org/description.php?id=6307052 since Pirate Bay switched from .sx to .org a while back.
Ah, thank you for the udpate! I have no idea how to add extra bones, I’m sorry :)